Tuesday, February 28, 2012

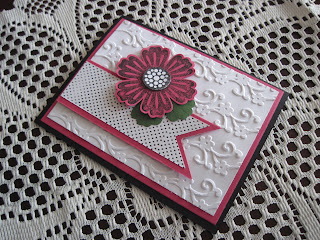
Mixed Bunch

I have this thing for Flowers! Real, fabric or paper...I love them.

In the Stampin'Up! Jan to April 30, 2012 Occassions Mini on page 17 is the Mixed Bunch Stamp Set(#125535 wood-mount, #125537 clear mount) and the coordinating Blossom Punch   #125603)! I saw that and  I knew "I gotta have it".  I am having so much fun with this coordinating set!

Coordinating stamps and punches make creating terrific looking projects fast and simple. Beyond the obvious you can use this floral set to create window cards, flower stencils, folded flowers, butterfly and dragonfly punch art, just to name a few!
Here are two cards that I made with this set.. One is a Window Card (more on that later).


Thursday, February 16, 2012

Another surface to Stamp!!

While I was at the Hardware store I was looking around at all the flooring tiles...you know the isle, the one with all the free samples. : )   I wanted some but I couldn't just take them...so I asked the clerk if I can have a couple and he said "sure take as many as you need!" ... I only took a couple, ok more than a couple.

 When I got home I went right to my craft room. I wiped them clean,  got out my stamping supplies and went at it.
 I used black StazOn ink, The Open Sea Stamp Set from Stampin'Up! Daffodil Delight, Soft Suede and Marina Mist  Stampin' Write Markers from SUP, brown acrylic paint and a sponge
I lightly sponged the brown paint onto the square. Stamped the image, let it dry and then used my markers to lightly color in the sky, sea and ship. When it was dry I put a coat of Mod Podge Clear to seal it all in.  I put felt backing on back. Perfect for coasters!

www.craftnique.blogspot.com
www.Hermyacosta.stampinup.net

Tuesday, February 14, 2012

Tapioca Pudding

Growing up my granny would make homemade tapioca. Yuck..I didnt like it.
Then, in my late teens my taste buds changed and I liked tapioca.,  my grannys tapioca anyway. She lived in West Virgina and I lived in California so I only had this treat once a year  (I would visit  my grandparents on their farm for a month every summer).
  As the years went by I bought the package type of tapioca but it just didnt taste the same. I tried making it myself but  constantly stirring was a pain in the you know what  and then it just didnt come out the way my granny's did.
 Last year while I was looking through my Slow Cooker Cookbook. I saw a recipe for tapioca!! 
The recipe said to add all ingredients, stir and then cook for  about 3 hours and continue to stir.... occasionally!   Easy peasy!
I bought a bag of small tapioca pearls, gathered up the rest of the ingredients  put it all in my slow cooker and.... it  came out perfect!! Tastes delicious!
 I make it quite often now because my husband loves it too!
The recipe calls for milk which I did the first few times but last week I thought I would use half milk and half almond milk! Yes there I go again..almond milk.  It really adds a yummy flavor to the tapioca. I also add vanilla ...love vanilla!!

Here is the  recipe 
4 cups milk     or    2 cups milk and 2 cups almond milk
2/3 cup white sugar
1/2 cup small pear tapioca
2 eggs lightly beaten
1 tsp vanilla....or more : )

Stir together the milk, sugar, tapioca,vanilla and eggs in slow cooker. Cover and cook on medium (Or high depending on cooker) 2 1/2 to 3 hours or on low 5 to 6 hours  stirring occasionally. Keep checking as each slow cooker cooks differently.

No need to soak the pearls first which is another reason for easy peasy!

Enjoy!

www.craftnique.blogspot.com


Friday, February 10, 2012

Luminaries and the Simply Scored Scoring Tool!!


I love using paper to make 3-D projects! Now, you might be thinking that is a little over the top, that 3-D projects take too much time. Well, I’ve got the solution for you! The Simply Scored Scoring Tool makes creating 3-D projects faster and easier than ever! It fits 12" x 12" paper, has full rulers across the top and down the left side that are marked at every 1/8". Plus there is a centering ruler along the top edge. The unique design includes holes for place markers at every 1/8" interval. The markers are great for saving time when scoring multiple projects and for making 3-D projects, like boxes.
 Storage compartments and a place for the included ergonomically designed stylus are great bonus features. The stylus has two tip sizes so you can choose which you prefer. The refined steel tip gets even smoother with use instead of wearing out like plastic tools do. With its sturdy yet lightweight design it doesn’t bow or slip around when you are scoring. You need to get your hands on this amazing tool so you can see for yourself how fun creating 3-D projects can be!

 Luminaries that we made at my Stampin Up workshop using the Simply Scored Scoring Tool.

You need
Simply Scored Scoring Tool (#122334)
Designer Series Paper (DSP)..cut to 4 1/2" x 10 1/2"
Vellum................cut to 2 1/2" x 2 1/2 "
Stamp (of your choice)
Ink
ribbon.......cut one 10" and one 12"  lengths
1 3/4 ' Circle Punch
adhesive
battery operated Tea light


Put the markers on your Simply Scored Scoring Tool at:
  2 1/2",      5",      7 1/2"    10"
lay the paper 10 1/2' side and score across using the  large tip of the stylus
turn paper to 4 1/2 side and score at 1 3/8"
fold at all scoring lines
all sides are 2 1/2 " with one 1/2" tab at end
decide where front should be and punch circle in center
Stamp image on vellum, when dry adhere to inside luminary with stamped image facing out. The luminary"bottom" will become the top so make sure you adhere image correctly.
Fold into box shape, adhere small ( 1/2") tab to inside box.
Fold down flaps to close making sure to fold front and back flaps last.
Using 12' ribbon adhere about 1/4 way up in inside box. Wrap around the outside and adhere to inside on the other side. 
Using the 10' ribbon tie a bow and adhere to top.
Turn on Tea light, place box over tea light. 

These make nice gifts...... or make a few for a Baby Shower or Bridal shower, birthday parties etc!!

www.hermyacosta.stampinup.net
www.craftnique.blogspot.com


Thursday, February 9, 2012

Anniversary!!

Yesterday my husband and I celebrated our anniversary..... we have been married 33 years but have been living together for 35 years so we always add that 2 years!
We went walking and enjoyed the (unusual) warm weather outdoors. We just hung out with each other all day. Later in the evening we went to El Toro Bronco for dinner. It was delicious. After dinner the server came out and gave us a dish of fried ice cream with the words "Happy Anniversary" written in chocolate syrup!   (The server overheard our conversation about our anniversary when she came to take our order). That was a nice surprise!  Fried Ice cream tasted like apple pie with ice cream, whip cream and chocolate syrup! It was soooo yummy.
I got some pretty roses and a card and he got his favorite..a HUGE bag of Hershey kisses with almonds packed in a SF 49er bag  and a handmade card!

It really was a nice Anniversary.

Friday, February 3, 2012

It is finally FRIDAY!!  All week I kept thinking it is Friday!!  Why???

I made a few Valentine's Day Cards,  (thanks to Debbie McNiel & Amy Barnes for the inspiration) I thought I would make a few so I can mail them out to family and friends. I made a couple of different styles but only took a picture of one...I will post the others later. They are treat cards. The treats stay put using a slider.
 While I was making the Valentine cards I realized my Anniversary is on the 8th..I need to make an anniversary card for my husband!! I better "get to thinking"
Enjoy your Friday!


www.craftnique.blogspot.com
www.Hermyacosta.stampinup.net