Wednesday, December 4, 2013

I have had this darn cold for a few days now. I have no energy. All I am doing is sitting and looking at all the craft sites online! Makes me want to get up and play in my craf troom but the body doesn't want to move lol!

Stampin Up has added a few things to our online store. They are offering a stack of pre-cut and pre-scored card bases. How cool is that. Saves time. 20 cards in each package.


                                                                    Hermys Store


Here are some pre made Christmas Cards Kit that they are offering,

Merry Little Christmas Clear-Mount Bundle   # 133287

BUNDLE & SAVE!
Merry Little Christmas Clear-Mount Stamp Set + Merry Little Christmas Simply Created Card Kit = 15% savings for you! Also available in Spanish and French.
Elements to make 8 cards: Card stock cards, envelopes, envelope liners, die-cut Designer Series Paper and card stock accents, buttons, Baker's Twine. Finished card size: 4-1/4" x 5-1/2


Merry Little Christmas Clear-Mount Bundle
Click here


I finished making my Christmas cards. I just need to mail them out. I love using the Gold and the Silver Glimmer paper and  the Vellum card stock.


I used this stamp set and this embossing folder
Joyful Christmas Clear-Mount Stamp Set    #131805


Pretty Print Textured Impressions Embossing Folder #132175

Pretty Print Textured Impressions Embossing Folder

Tuesday, September 10, 2013

CRAYON RESIST
1) Stamp your image in Basic Black Classic ink or StazOn ink on Glossy White or  plain white card stock.

2) Color areas you want to remain white--or that you want different from your background color--using White  Crayon.

3) Use a brayer or sponge daubers to cover the entire surface of the card stock with ink.

4) Wipe off excess ink with a tissue.

Tips:

·  Give the ink time to dry before coloring your image with your crayon; otherwise the lines of  your image may smudge.


·  After  Step 4, you can color over the masked area with Stampin' Write markers or using watercolor tools.


Monday, September 9, 2013

envelopes

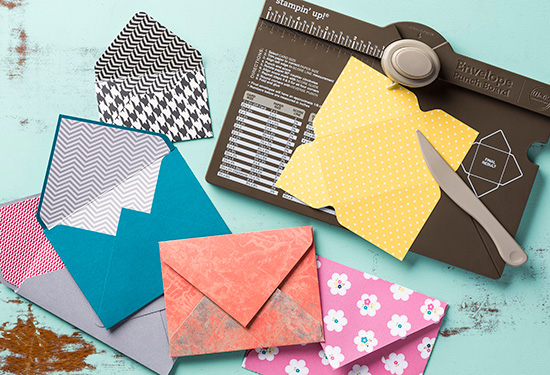
 Here are some envelopes I made using the Envelope punch from Stampin Up!

I made a 3 1/2" x 3" note card with  matching envelope.


Here are two small envelopes different shapes


This is the smallest size envelope and the largest size envelope
Small fits a 2"x 3 1/2" card. Large envelope fits a 6" x 8 1/2" card

Hermy's Shop

Sunday, September 1, 2013

Envelope Punch !!

b1_EnvelopePunch_demo_aug1513_NA


This brand new Envelope Punch from Stampin Up is now available!!! 

You will be able to make envelopes of any size! 

Use Card Stock, Designer Paper, Vellum and more!

 Details:

It creates envelopes in up to 66 different sizes.
It's super easy to use
It's small and lightweight
It has a slick scoring too that fits in its own little spot 
It has a punch that lets you create rounded corners
The price...$19.95
It will be in next years annual catalog, so it's here to stay


I pre-ordered my Envelope Punch  and I have been making envelopes of all sizes.  I even made a gift card holder.

I will post pictures next time!

Click  Here  to order yours today and start making your own envelopes!

Thursday, August 29, 2013

Yummy Dip


I was craving a good dip for my corn tortillia chips.

I wanted something different than the usual salsa etc.

I thought "why not use garbonzo beans" ( some call them chickpeas).

So......

I cut up a couple of avocados ,tomatoes, green onion, celantro, garlic,vinegar,olive oil, seasonings and a can


of garbonzo beans.

It was delicious.

Actually it is so good..who needs tortilla chips,  a spoon works just as good!


Tuesday, August 27, 2013

Playing with air dry clay!

I have been having a lot of fun with the Simply Pressed Clay and Buttons and Blossoms Pressed Clay Molds from Stampin Up!! The clay is so soft and easy to work with. When dry it is very lightweight, feels like foam! You can add color to clay before molding by kneading ink into the clay. Or you can color after it has dried using markers paint, glitter etc. Or just leave it white!
There are many ways to pop clay out of the mold. I tried them all, putting cornstarch in mold was a good method, baby oil wipes in mold was a bit messy for little ol me and just pulling them out and "fixing" it up before drying was...well didn't work for me. I found the best results to put the mold with clay in the freezer for 10 to 20 minutes. They popped right out and the results looked great!


 Also when using the button mold, place a bit of clay in mold and gently roll the clay. This opens up the button holes...easy-peasy.


The package is 2.4 oz but it goes a long way. I have a 7 1/2 by 5 1/2 container full of my clay embellishments. Oh and did I tell you that you can use any mold. I used my polymer clay molds,candy molds etc!! Like I said I am having fun!  They make great embellishments!!


Simply Pressed Clay item # 130685
Buttons and Blossoms Simply Pressed Clay Molds Item # 131272
You can click  Hermys shop  for more information or to place an order!

Have a great day! Thanks for stopping by! :)


Friday, April 19, 2013

Color changes at Stampin'Up!


Some changes with the colors at Stampin'Up! coming soon.  The Color change will be in our new annual 2013-2014 catalog. The "Goodbye" colors are still available until sold out .

Thursday, April 18, 2013

Brayer Technique

I love going to thrift shops. I especially love it when I find a great "deal" on craft supplies.
I came across a Clear 12 x 12 plastic case filled with goodies. All for $2.99. The case was sealed with tape so I couldnt open it up to look inside at all the goodies.(But) Looking through the plastic container and turning it upside down etc....I did see some ribbon, paint brushes, thread, and a Brayer!!!!  I bought it. The brayer was still in the original package, unopened!!! New paint brushes too.  So much "stuff" inside, well worth the $2.99.

Here is a cool technique to use with the Brayer


LAYERED BRAYER

Directions:

 Heat emboss your chosen images on Glossy White card stock using VersaMark ink and Clear Stampin' Emboss powder. Bold images work best for this technique.

 Ink your brayer with a light color of ink, and bray your card stock.

 Use a sticky note or scrap paper cut to desired shapes and sizes to cover portions of your card stock.

 Ink your brayer with a darker color of ink, and bray your card stock again.

 Repeat process if extra layers are desired.

 Remove paper scraps and wipe embossed images to remove excess ink. 


Hermy's Store

Friday, April 5, 2013

Free Shipping SUP


FREE shipping on EVERYTHING April 6-8 (excluding expedited orders)! That's right. There are no minimums or limits!!

My Store

Tuesday, March 19, 2013

Spring is in the air....


Stampin' Up is giving us a peek at one of the products that will be available in the 2013-2014 Annual Catalog which starts June 1st.  

You can buy the "A Round Array" Stamp Set in a bundle with the 7/8" Scallop Circle Punch (from the Spring Catalog) at a 15% discount, or just order the set alone if you already have the punch.

For now the stamp set is being offered only in clear, but will also be available in wood when the catalog goes live.


Item numbers:
For the bundle which includes the punch -
Spring Surprise Bundle #133899 (clear ) - $23.95 - English
Bundle in Spanish #133897, French is #133898

Stamp Set only:
A Round Array Stamp Set #129090 (clear) - 14.95 - English
Spanish Set is #131682 and French Set is #131616
To place an order click  HERE

Tuesday, March 12, 2013

Stamping Off!!

I like to try different techniques when stamping.. One of  my favorite techniques is called "Stamping Off".
This Technique is a great way to get several shades of color from one ink pad.
It is also a great way to show motion ,such as a ball moving through the air.

Here is how to do it.

Ink a Stamp using any color ink pad

Stamp the image

Re-stamp the image one or more times without re-inking it.


www.Hermyacosta.stampinup.net

My Etsy Shop


Wednesday, March 6, 2013


Stampin' Up! 25th Annivesary Collector's Set: Best of Flowers


As part of our 25-year anniversary celebration, we're bringing back some of our favorite stamp images from the last quarter century and combining them into 12 sets, which will release-one set per month-during 2013. Even better, along with some great classic images, each "Best of" set will also include a never-before-seen image! 
Some things to remember:
All Best of stamp sets will include 3-5 images, including a never-before seen image, and will be priced at $14.95.
All of the Best of sets will be available until March 31, 2014.
All Best of stamp sets are available in Clear-Mount only.
While we are releasing just one Best of stamp set per month, all of the Best of sets will be available until March 31, 2014.

As a special incentive to collect the Best of stamps, we're including a collector's card and 25-year proof of purchase sticker with every Best of set. Collect six stickers, and send it in to redeem a FREE set of your choice valued up to $14.95! Free sets must be redeemed no later than April 30, 2014.


Click the links to see the other sets - still available for purchase.
January - Best of Birthdays
February -Best Of Love
March - Best Of Flowers

Thanks for stopping by. www.Hermyacosta.stampinup.net

Tuesday, March 5, 2013

Faux Metal


FAUX METAL


Directions
 Cut card stock to desired size 

stamp a VersaMark pad over the entire piece. 
Sprinkle Gold  Stampin' Emboss powder over card stock piece.

Heat powder using heat tool. 

Sprinkle on additional powder while the image is still hot
 reheat.
 Repeat at least three times.

 To create image

 ink your stamp with VersaMark ink (to avoid sticking)
  press into warm layers of embossing powder.

Tip:
Have your inked stamp ready to use immediately
 after the last time you heat the powder
If you wait too long, 
the embossing will harden to the point
 that you won't be able to create an impression with your stamp
 (if this does happen, simply reheat the card stock piece.)


Stampin Up Cardstock Whisper White        item #100730
Versa Mark                                                item #102283
Stampin Emboss Powder                            item # 109129  Gold
Heat Tool                                                   item #  129053
Stamp of your choice

You can order these products on my webstite   click link on side bar or go to
www.Hermyacosta.stampinup.net


Saturday, February 9, 2013

Monthly Card Kit


Calling all Crafting Cinderellas….your Paper Pumpkin awaits!


Let this creative coach whisk you away to a 30 minute journey into creativity once a month. Emerge rejuvenated and invigorated with something to share or keep and enjoy.  Everything you need (except adhesives) is included to create fun and unique projects you will love sharing with friends and family.

How it works:

Every month a new, surprise project kit arrives at your doorstep.  Each provides the anticipation of creating a fun project to pin, showoff, and share with your friends and family-every month!
·         Each month we send you a unique, surprise kit with a project-cards, journals, décor, and more! (We've even color-coordinated, measured, and precut everything for you!)
·         Each kit includes stamps, ink, paper, and accessories-everything but adhesive.
·         Each kit gives you a 30-minute creativity escape.
·         We will ship your Paper Pumpkin on or around the 15th of the month.  
·         You need to sign up for a kit by the 10th of the month to get that month's kit. If you sign up on the 11th of the month, your first kit will come the next month. (Let's say you sign up on May 10th, we'll send your kit around May 15th. If you sign up on May 11th, we'll send your first kit around June 15th.)
·         A Paper Pumpkin membership is $19.95 per month (and shipping is included!). 
·         There's no commitment, you can cancel your monthly Paper Pumpkin at anytime. You can also skip a month if you want.
·         Starting in early March, we'll offer a Try-It kit if you'd like to try Paper Pumpkin for one month only.
Sign up for your monthly Paper Pumpkin starting Monday, January 14 by visiting www.mypaperpumpkin.com and click Get it.  Starting in early March, you can try Paper Pumpkin for one month by visiting our online store.

Stampin Up! Demonstrator is   Hermy Acosta   www.Hermyacosta.stampinup.net
A Free Gift in Your Very First Kit
The Welcome Kit is the very first Paper Pumpkin you will receive in your first month of membership.  The Welcome Kit includes a free gift-a clear acrylic block!

Whether you are an old hand with Stampin’ Up or are entirely new to crafting and creative paper endeavors, you are going to love Stampin’ Up’s new Paper Pumpkin program.

Saturday, January 19, 2013

I have been busy making some Valentine projects. I made  some ACEO's,  Gift box with matching Gift card, and of course a few cards.


These were made from Stampin Up! products.

Main Catalog:

 Kraft Gift Box #124106
 Large Oval Punch #119855
Real Red Ink #126949
Rhinestone Basic Jewels #119247

These Products are in the New  2013 Spring Catalog:

Textured Impressions Embossing Folder Honeycomb #129378
More Amore Specialty Designer Series Paper  #129309
Hearts a Flutter Stamp Set and Framelits Dies Bundle # #131097 you save $$ by ordering the Bundles!
Core'dinations Card Stock  Primrose Petals (which is sandable) #129322

www.Hermyacosta.stampinup.net

Wednesday, January 16, 2013

Valentine Card and Natural Composition Specialty Paper

Natural Composition Specialty Designer Series Paper (#126917) From Stampin Up!

“Some of our best products are hidden in the back of our catalog just waiting to be discovered.
The Natural Composition Specialty Designer Series Paper is one of these hidden treasures.
Its neutral Crumb Cake color camouflages its true beauty.
This specialty paper is heavier than our normal card stock and has glossy, embossed designs.
From a natural, masculine, wood grain pattern to detailed floral images, you’ll find lots of reasons to love the 6 different styles included in this one pack.
Add a touch of elegance to your project with the Natural Composition paper as it is, or use a variety of resist techniques to really make this treasure shine.
You can discover the beauty and versatility of the Natural Composition paper by sponging ink over the glossy, embossed images. The ink won’t absorb into the glossy embossed images so you can really highlight the details of the patterns.

Here is a Valentine Card I made using the Natural Composition Paper. I made a stencil using my Full Heart punch (#119883) and rubbed Early Expresso Ink around the edge. I then used Real Red Ink around the stencils and lightly inside the heart. Easy to do, just rub ink on with a Stampin Sponge or dauber. You can wipe with a tissue paper or leave as is, I wiped lightly with a tissue paper. The striped heart is also Natural Composition paper inked and then punched out using the  Full Heart Punch.


Some popular techniques that you can use with the Natural Compositions Specialty Designer Series Paper are: Resist, Rainbow Resist, Stencil Resist, Blender Pen Resist, and Suede Flower! Order your Natural Composition paper today and discover all the fun you can have!” I am addicted to it!! LOL

DBWS Store Page:   DBWS

Saturday, January 12, 2013

Valentine Special

It is chilly today!!!  We are up in the Northern California area visiting our son and it is cold....

I plan to make a few cards today. I will post  some pictures when I am done. I had a big order come in from Stampin Up so I am pretty excited to play with my new stuff. I did get a few free items because of the Sale A Bration event....for every $50.00 spent you get a free product from the Sale a Bration brochure.   I am very happy that I was able to have my products delivered to my sons house!!

Stampin Up is offering two Specials for Valentines. They are cute. Click on the widget in my side bar to see the offers.
Also you can see the New products in our new Spring Catalog by clicking that widget just below the Valentine Special.

Have any questions you can leave a comment or go to my site

www.Hermyacosta.stampinup.net

Keep yourselves warm and safe my blogger friends. Stay creative!!

until next time......


Wednesday, January 2, 2013

Happy New Year!!

Happy New Year!!

I spent Christmas and the next 4 days in bed with the flu .
On Christmas Eve it just hit me, no warning. I was fine one minute and sick the next.
My oldest son and I share a birthday Dec 28 and I was still sick!!
Finally today I am feeling somewhat normal~!

So,  ~while resting and recovering.....

I came up with a few ideas and plans for my Stampin Up business, my blog,  my Facebook page and just maybe  ~~~~~  get a twitter account! 

Now I just need the energy !!!